Passive Baluns
Video Baluns come on two distinct groups: passive and active.
- Passive
- Passive baluns require no power to operate and work well up to about 500 metres.
- Active
- Active baluns require power and can send video signals over 1Km down a low cost CAT5 cable.
Passive Baluns
- Send and receive video and power 100m down 1 CAT5 cable

- BAL210 Instructions >>>
-
Using the Antihum Video Balun BAL210
- Run your CAT5 cable between your camera and CCTV equipment.
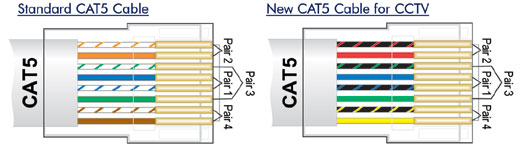
- Identify the various pairs within the CAT5 cable. See below.
- Strip back about 1cm of sheathing on the CAT5 and then fan out the individual cores so that they will slide into the RJ45 plug in the correct order. Please take great care to get the cores in the correct order, as this is where mistakes are easy to make.
Once the cores are in the RJ45 plug, you need to use your crimping tool to make off the end. TIP - make sure all the cores go to the end of the plug or they won't all be crimped!! You must use identical colour coding on both ends of the CAT5 and ensure each colour goes to the correct pin.
Once crimped, connect the RJ45 plugs to the balun, which effectively creates two BNC plugs. You can then fit these plugs directly on to the camera's BNC socket and the BNC socket of the control equipment, i.e. switcher, quad, etc.
Coming out of one of the baluns is a short lead with a 2.1mm DC power plug. At the camera end this obviously needs to connect in the camera's DC power socket. At the control equipment side, the balun has a DC power socket to connect it to a power supply.
- Send & receive 1 video signal 500m down CAT5 cable
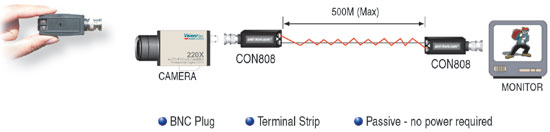
- CON808
- Send & receive video & power 100m 1 CAT5 cable
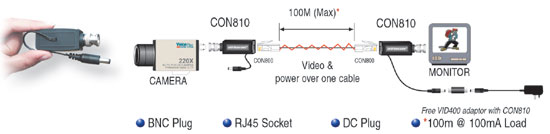
- CON810
- Send & receive video & audio 500m down 1 CAT5 Cable
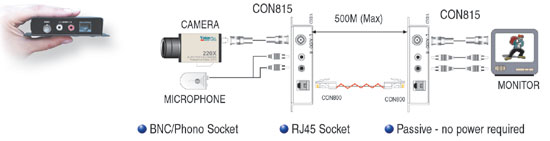
- CON815
- Send & receive 4 video signals 500m down 1 CAT5 cable
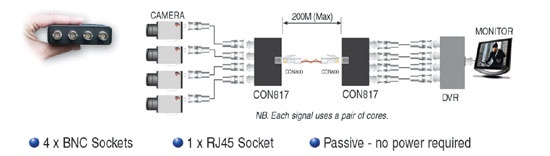
- CON817
- 4-way converter - 4 RJ45 sockets into 4 BNC sockets
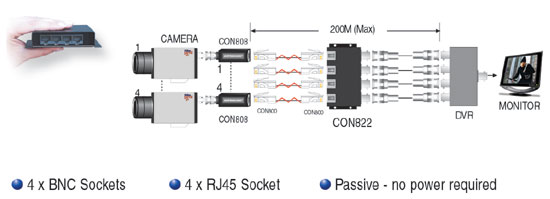
- CON822